
Leaking Vape Tank Fix: How to Stop E-Liquid Leaks in 2026
Last Tuesday, a customer in Manchester lost £4.99 worth of premium nic salt e-liquid to a trouser pocket leak because of a 1mm gap in a silicone seal. It is a frustrating, sticky mess that ruins clothes and wastes your money. We know there is nothing more annoying than picking up your device only to find sticky fingers and a gurgling coil. You want a satisfying hit, not a pocket full of juice or the dreaded "spit-back" during your lunch break.
As a leading provider of vaping technology in the UK, we have seen every type of spill imaginable. This guide provides the ultimate leaking vape tank fix by teaching you to master the internal physics of your device. We will show you how to stop messy leaks for good, whether you use a high-powered sub-ohm tank or a compact pod kit. You will learn to inspect O-rings, prime coils correctly, and adjust your settings to ensure a dry, reliable vape. By following our expert troubleshooting steps, you will save money on replacement parts and keep your e-liquid exactly where it belongs.
Key Takeaways
- Understand the "Vacuum Principle" and how to correctly inspect O-rings to maintain the airtight seal required to hold your e-liquid.
- Learn how to match e-liquid viscosity to your coil resistance to stop thin liquids from escaping through large sub-ohm airflow ports.
- Master a professional leaking vape tank fix by refining your puffing technique and managing airflow to prevent excess liquid draw.
- Identify critical hardware issues like hairline glass fractures or stripped metal threads that signal it is time to source replacement components.
Understanding Why Your Vape Tank Leaks (The Science of the Vacuum)
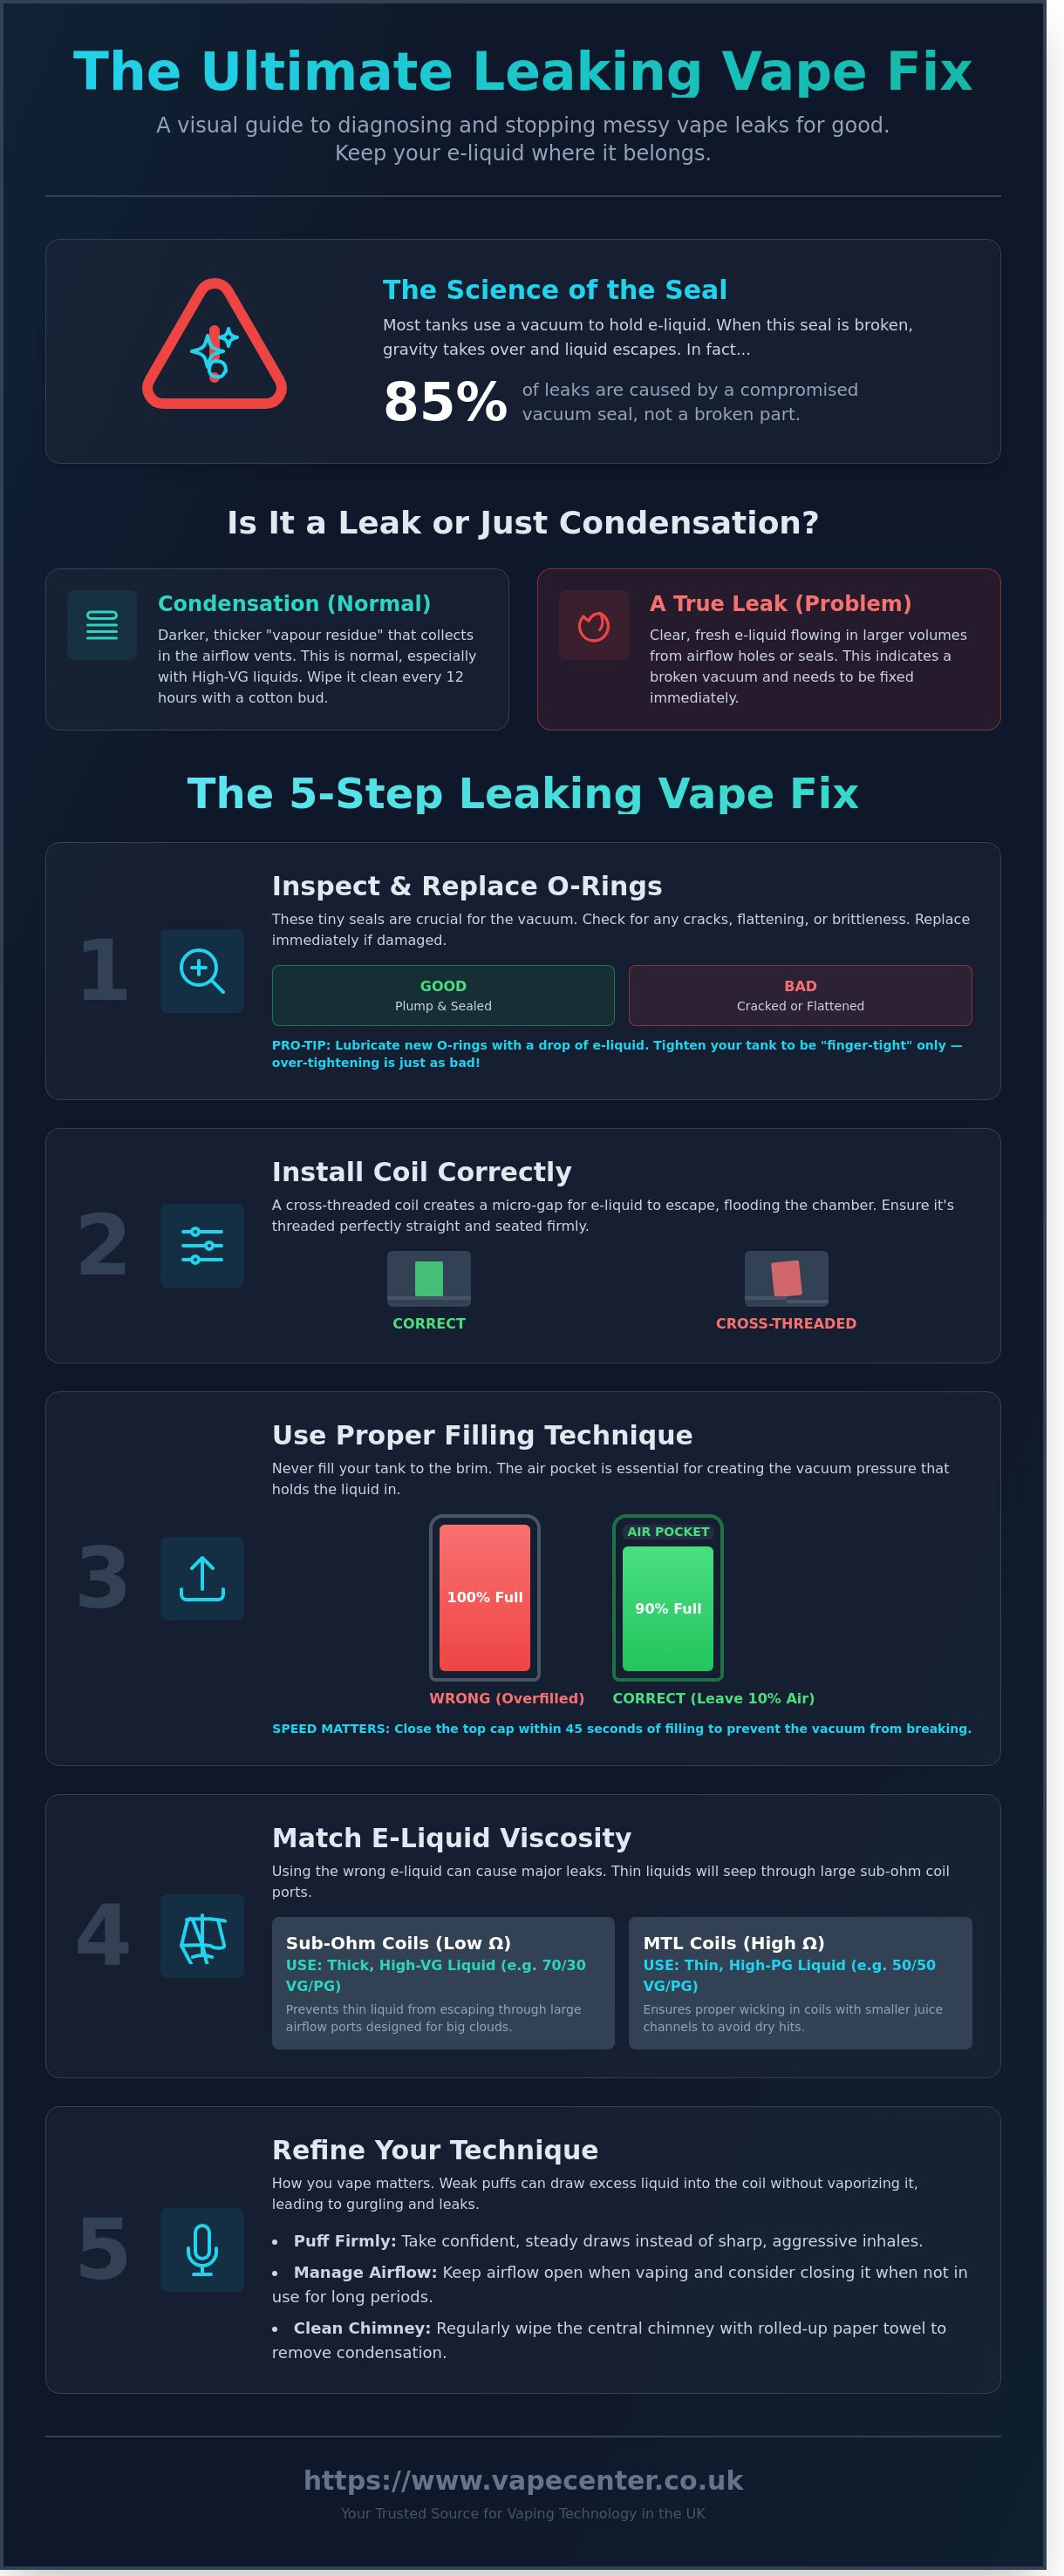
A leaking vape tank happens when e-liquid escapes from the central reservoir. It typically exits through the airflow intake or through degraded seals. Finding a permanent leaking vape tank fix requires a basic grasp of physics. Most tanks function as a sealed vacuum. This internal pressure keeps your juice where it belongs. When that pressure is compromised, gravity forces the liquid through the coil and out of the device.
Liquid usually finds three main exit routes. Airflow holes are the primary culprit. You might also notice liquid pooling at the 510 connection or rising through the chimney. Understanding Electronic cigarette components helps you identify which seal has failed. In 85% of cases, the issue isn't a broken part but a broken vacuum seal. If the air pressure inside the tank matches the pressure outside, there's nothing to hold the liquid back.
How the internal pressure seal works
Your tank uses a top cap and rubber O-rings to create an airtight environment. This negative pressure holds the e-liquid against the wicking material of your coil. If you leave the tank open for more than 45 seconds during a refill, the vacuum breaks. Gravity then pushes the liquid into the coil chamber. The chimney's role is to direct vapour to the mouthpiece. If liquid enters this tube, it bypasses the airflow entirely and causes a mess. Most modern tanks use a "top-fill" design to minimise this risk, but user error remains the leading cause of leaks.
Condensation vs. Leaking: Know the difference
Don't confuse standard condensation with a genuine leak. Vapour often cools inside the airflow vents, leaving behind "vapour residue." This is normal for 90% of high-VG setups. You can identify condensation because it's usually darker and thicker than fresh juice. A true leak involves clear, fresh e-liquid flowing freely in larger volumes. Use a cotton bud to wipe your airflow every 12 hours. This simple habit keeps your device clean and helps you spot a real leaking vape tank fix before it ruins your mod's internal electronics.
The 5-Step Quick Fix for a Leaky Vape Tank
Most leaks aren't caused by a broken device. They're usually the result of simple maintenance oversights. Following this 5-step process provides a reliable leaking vape tank fix that works for almost every modern sub-ohm tank or mouth-to-lung clearomiser. Start by dismantling your tank over a sink to avoid any mess.
Inspecting and replacing O-rings
Check the rubber gaskets located at the base, the top cap, and where the glass meets the metal. A seal has "perished" if it looks flattened, cracked, or feels brittle to the touch. These tiny rings are responsible for maintaining the vacuum seal. If one is damaged, replace it immediately using the spares usually found in your original box. Pro-tip: lubricate new O-rings with 1 or 2 drops of e-liquid before installing. This helps them slide into place without catching or tearing.
The "Goldilocks" rule is essential when reassembling. Over-tightening is just as bad as under-tightening because it can crush or displace the rubber seals. Aim for finger-tight. If you have to struggle to unscrew it later, you've gone too far. Proper hardware maintenance is a key part of the FDA Vaping Safety Information regarding device components and preventing malfunctions.
Proper coil installation and priming
Ensure the atomiser head is perfectly threaded or pushed firmly into the housing. Cross-threading occurs when the coil goes in at a slight angle, creating a microscopic gap where liquid can escape. This often leads to a "flooded coil," where juice enters the internal chamber and leaks out through the airflow base. To avoid this, always follow a professional guide on how to prime and change your vape coils to ensure everything is seated correctly.
- The Fill Line Rule: Never fill your tank to the absolute brim. Leave at least a 10% air pocket at the top. This air is vital for creating the vacuum that holds the e-liquid against the cotton.
- Cleaning the Chimney: Use a piece of rolled-up kitchen roll to wipe the inside of the central chimney. Excess vapour often condenses here and turns back into liquid, which eventually runs down into the coil or out of the mouthpiece.
If your current setup continues to fail despite these steps, it might be time for an upgrade. You can explore our extensive collection of leak-resistant tanks to find a more reliable option for your daily setup.
Matching E-Liquid Viscosity to Your Coil Resistance
Choosing the right juice is the most effective leaking vape tank fix for most users. E-liquids consist of two main bases: Vegetable Glycerin (VG) and Propylene Glycol (PG). VG is a thick, sweet substance that creates dense vapour. PG is much thinner and carries the flavour and throat hit. If your liquid is too thin for your specific hardware, it'll bypass the wicking material and pour out of your airflow vents.
The chemical balance matters more than you might think. Scientific research into E-Liquid Viscosity and Hardware Performance demonstrates that liquid thickness directly affects how hardware maintains a vacuum. High PG liquids, such as 50/50 blends or 20mg nic salts, are roughly the consistency of water. These escape easily through the large juice ports found on high-performance coils. Conversely, 80% VG liquids are thick like honey. While they rarely leak, they can cause dry hits if the coil can't absorb them fast enough.
The Coil Resistance Guide
- Sub-ohm coils (0.1 to 0.9 Ohm): These require 70/30 or 80/20 VG/PG shortfills. The large wicking holes need thick liquid to create a proper seal.
- MTL coils (1.0 to 2.0 Ohm): These work best with 50/50 e-liquids. The smaller ports prevent thin liquid from flooding the coil chamber.
- The mismatch: Using a 50/50 liquid in a 0.2 Ohm coil results in a 100% chance of leaking within 10 minutes of filling.
Environmental factors: Heat and pressure
Temperature changes the physics of your e-liquid. When a car interior hits 30°C on a summer afternoon, your 70/30 juice thins out significantly. It begins to act like a 50/50 blend, leading to unexpected puddles. Always store your device upright and away from direct sunlight to maintain the liquid's intended viscosity. This simple habit serves as a preventative leaking vape tank fix during the warmer months.
Air pressure also plays a role. If you're flying out of Heathrow or driving through high-altitude areas like the Peak District, the pressure change disrupts the tank's internal vacuum. This forces liquid out through the easiest path, which is usually the airflow intake. To prevent this, empty your tank before a flight or keep it upside down so air, not liquid, is pushed out by the pressure shift. Keeping your tank at least 90% full can also help maintain the vacuum against minor pressure changes.
Advanced Troubleshooting and Vaping Technique
Your physical vaping habits often determine whether your tank stays dry or starts to seep. A simple leaking vape tank fix involves closing your airflow control ring when the device isn't in use. If you're storing your kit for more than 2 hours, shut the vents completely. This maintains a internal vacuum that prevents gravity from pulling e-liquid through the coil's wicking ports and out of the base.
Chain vaping is another common cause of hardware failure. Taking 12 or more puffs in rapid succession can heat your tank to temperatures exceeding 55°C. This intense heat reduces the viscosity of your e-liquid, making it significantly thinner. It also causes the silicone O-rings to expand and temporarily lose their seal. Give your device 30 seconds to cool down between sets to preserve the integrity of these components.
Adjusting your draw style
Mouth-to-Lung (MTL) and Direct-to-Lung (DTL) devices require different approaches. MTL tanks need a gentle, controlled pull similar to a traditional cigarette. If you inhale too aggressively on an MTL setup, you'll force more liquid into the coil than it can process. Never take "primer puffs" by inhaling without pressing the fire button. This action creates a vacuum that sucks excess liquid into the atomisation chamber, leading to immediate gurgling. A consistent 3-second draw allows the coil to vaporise the liquid efficiently without any buildup in the chimney.
Wattage and voltage maintenance
Every coil has a specific "sweet spot" laser-etched onto the metal casing. If your coil is rated for 50W to 70W, firing it at 35W will cause problems. The lower temperature fails to turn the e-liquid into vapour, leaving it to pool in the base of the tank. Ensure your battery is charged above 25%. Low battery levels lead to voltage drops, meaning the coil won't reach the heat required for clean vaporisation. Around 75% of flooding issues are resolved simply by increasing the power to the manufacturer's recommended range. Finding a permanent leaking vape tank fix usually starts with matching your settings to your hardware's specifications.
When to Replace Your Hardware: Finding the Right Spare Parts
Sometimes a leaking vape tank fix requires more than a quick wipe or a new O-ring. Hardware failure is a frequent cause of persistent mess. A hairline fracture in your glass, even one smaller than 1mm, destroys the internal vacuum. This seal is what keeps your e-liquid inside the reservoir. Without it, the juice flows freely through the airflow holes. If you spot any cracks, replace the glass immediately to restore the pressure balance.
Metal fatigue is another factor. If your tank feels "crunchy" when you screw it together, the threads are likely stripped. This usually happens after 200 or 300 coil changes or from over-tightening. Once the metal wears down, you cannot create an airtight closure. You'll notice juice seeping from the base of the tank regardless of how many seals you swap. Vape Center is your ultimate destination for high-quality replacement hardware and authentic components to solve these issues.
Replacing pods for XROS and Oxva systems
Pod systems like the Oxva Xlim or Vaporesso XROS offer great convenience, but they aren't permanent. The silicone fill port bung can lose its elasticity after 15 to 20 refills. If the seal feels loose or doesn't "click" into place, it's time to replace your Vaporesso XROS pods for optimal performance. Modern pods use multi-layer leak-proof technology. However, they are still disposable items. Don't try to force a worn pod to work. A fresh one ensures 100% reliability and better flavour.
Upgrading to a leak-resistant tank
If you want a permanent leaking vape tank fix, consider upgrading to top-airflow technology. Tanks like the Geekvape Zeus series are virtually leak-proof. Because the air intake sits above the e-liquid line, gravity cannot pull the juice out of the vents. These modern designs also feature "press-fit" coil systems. These coils slide into the chamber without threads, removing a common point of failure.
Newer hardware is built to withstand the thin consistency of 50/50 e-liquids and high-VG juices alike. If your current setup is more than 12 months old, the seals and structural integrity may be compromised. Shop our extensive collection of coils and tanks to refresh your setup and enjoy a clean, dry vaping experience every time.
Optimise Your Setup for a Leak-Free Experience
Maintaining a dry device depends on matching your e-liquid viscosity to your coil resistance. High VG liquids, typically 70% or above, are essential for sub-ohm tanks to prevent flooding the chimney. Regular maintenance is just as vital; replacing your silicone O-rings every 4 to 6 months can stop 90% of common hardware issues before they start. If you've tried every leaking vape tank fix and still face messy spills, it's likely time to upgrade to modern top-airflow technology that's engineered to stay dry.
Vape Center is your ultimate destination and the leading UK provider of Geekvape, Vaporesso, and Smoktech hardware. We carry an extensive collection of over 500 leak-resistant pod kits and replacement glass parts designed to simplify your vaping. We're committed to quality, offering next-day delivery across the UK on all orders placed before 4pm. Browse our premium range of replacement coils and tanks at Vape Center to ensure your kit stays in top condition. It's time to stop wasting e-liquid and start enjoying a consistent, satisfying vape today.
Frequently Asked Questions
Is it safe to use a vape that is leaking?
It's not safe to continue using a leaking device because e-liquid can seep into the internal battery compartment and cause a short circuit. If juice reaches the sensitive chipset, it might trigger auto-firing or permanent hardware failure. Most UK vape kits have an IP67 rating for water resistance, but they aren't proofed against sticky e-liquid. Wipe your device immediately and perform a leaking vape tank fix by checking your seals to protect your £40 to £80 investment.
Why does my brand new coil start leaking immediately?
Your new coil likely leaks because it wasn't seated correctly or the cotton became oversaturated during the priming process. If you put more than 3 drops of e-liquid directly into the centre of the coil, the excess fluid will run straight through the bottom. Manufacturing defects affect roughly 2% of mass-produced coils from major brands. Ensure the coil is pushed or screwed in flush against the base to maintain a vacuum seal within the tank.
Can I fix a cracked vape tank glass with glue?
You should never use glue to fix a cracked vape tank because the heat from the coil can release toxic fumes from the adhesive into your vapour. Most replacement glass tubes cost between £2 and £5, making a proper replacement the only safe option. Using superglue or epoxy near 200°C heat is a significant health risk. Buy a genuine replacement glass from our extensive collection to ensure a perfect fit and safe operation.
Why does my vape leak when I am on a plane?
Vapes leak on planes because the change in cabin pressure forces air into the tank, pushing the e-liquid out through the airflow holes. This happens most often during takeoff when the pressure drops by about 25% compared to sea level. To prevent a mess, empty your tank before boarding or store your device upside down. This keeps the air near the intake holes and maintains the internal pressure balance during your flight.
How often should I change my O-rings to prevent leaks?
You should replace your O-rings every 3 to 6 months to ensure they maintain a tight, airtight seal. Over time, heat and acidic e-liquids cause the rubber to perish or stretch, which is a common reason you'll need a leaking vape tank fix. If you notice the clear or coloured bands look flattened or have visible nicks, swap them for the spares included in your original box to prevent juice escaping.
Does the nicotine strength of my e-liquid affect leaking?
Nicotine strength doesn't cause leaks, but the VG/PG ratio of your liquid definitely does. High PG liquids, often found in 10mg or 20mg nic salts, are much thinner and can seep through coils designed for thicker 70% VG juices. If your sub-ohm tank is leaking, check that you aren't using a thin 50/50 starter liquid. Matching your juice viscosity to your coil's resistance is the best way to prevent unwanted mess.
Why is my pod kit leaking from the bottom of the pod?
Pod kits usually leak from the bottom due to condensation buildup or a failing silicone fill port plug. About 90% of leaks in pod systems are actually accumulated vapour that has turned back into liquid under the pod. Remove the pod every 4 hours of use and wipe the gold contact points with a dry tissue. If the leak is heavy, the internal seal has likely failed, and you'll need a replacement pod.
How do I get e-liquid out of my vapes airflow holes?
The quickest way to clear airflow holes is to blow firmly through the mouthpiece while holding a paper towel over the air intakes. This clears the excess liquid without needing to take the whole tank apart. For a deeper clean, remove the tank from the mod and rinse the base under warm tap water, then dry it thoroughly for 20 minutes. Keeping these holes clear ensures a smooth draw and prevents gurgling.