
How to Prime a Vape Coil: The Ultimate UK Guide to Better Flavour and Longer Coil Life
Imagine spending £14 on a fresh pack of premium coils only to have the first one taste like burnt toast after just three puffs. It's a frustrating waste of money that ruins your e-liquid flavour and forces you back to the shop much sooner than planned. Most vapers have experienced that sharp, acrid sting of a dry hit, and it almost always happens because the cotton wick wasn't properly saturated before firing the device.
Mastering how to prime a vape coil is the most effective way to stop wasting your cash and start enjoying a consistently pure vape. By following the correct steps, you can increase your coil longevity by as much as 40% and eliminate those harsh, throat-burning surprises. This guide breaks down the essential priming process for every major kit type, ensuring you get the best performance and maximum value from your replacement parts.
Key Takeaways
- Stop wasting money on burnt coils by understanding the essential process of pre-saturating your cotton wick before firing.
- Master the step-by-step "Drip and Wait" method to learn how to prime a vape coil for maximum flavour and performance.
- Learn how to choose the correct e-liquid consistency for your coil's resistance to ensure a smooth, satisfying vape every time.
- Discover pro techniques like dry pulls and low-wattage breaking-in to extend the lifespan of your hardware and avoid shocking new cotton.
- Implement simple maintenance habits that prevent "wick starvation" and keep your premium e-liquids tasting fresh for longer.
What is Priming a Vape Coil and Why is it Essential?
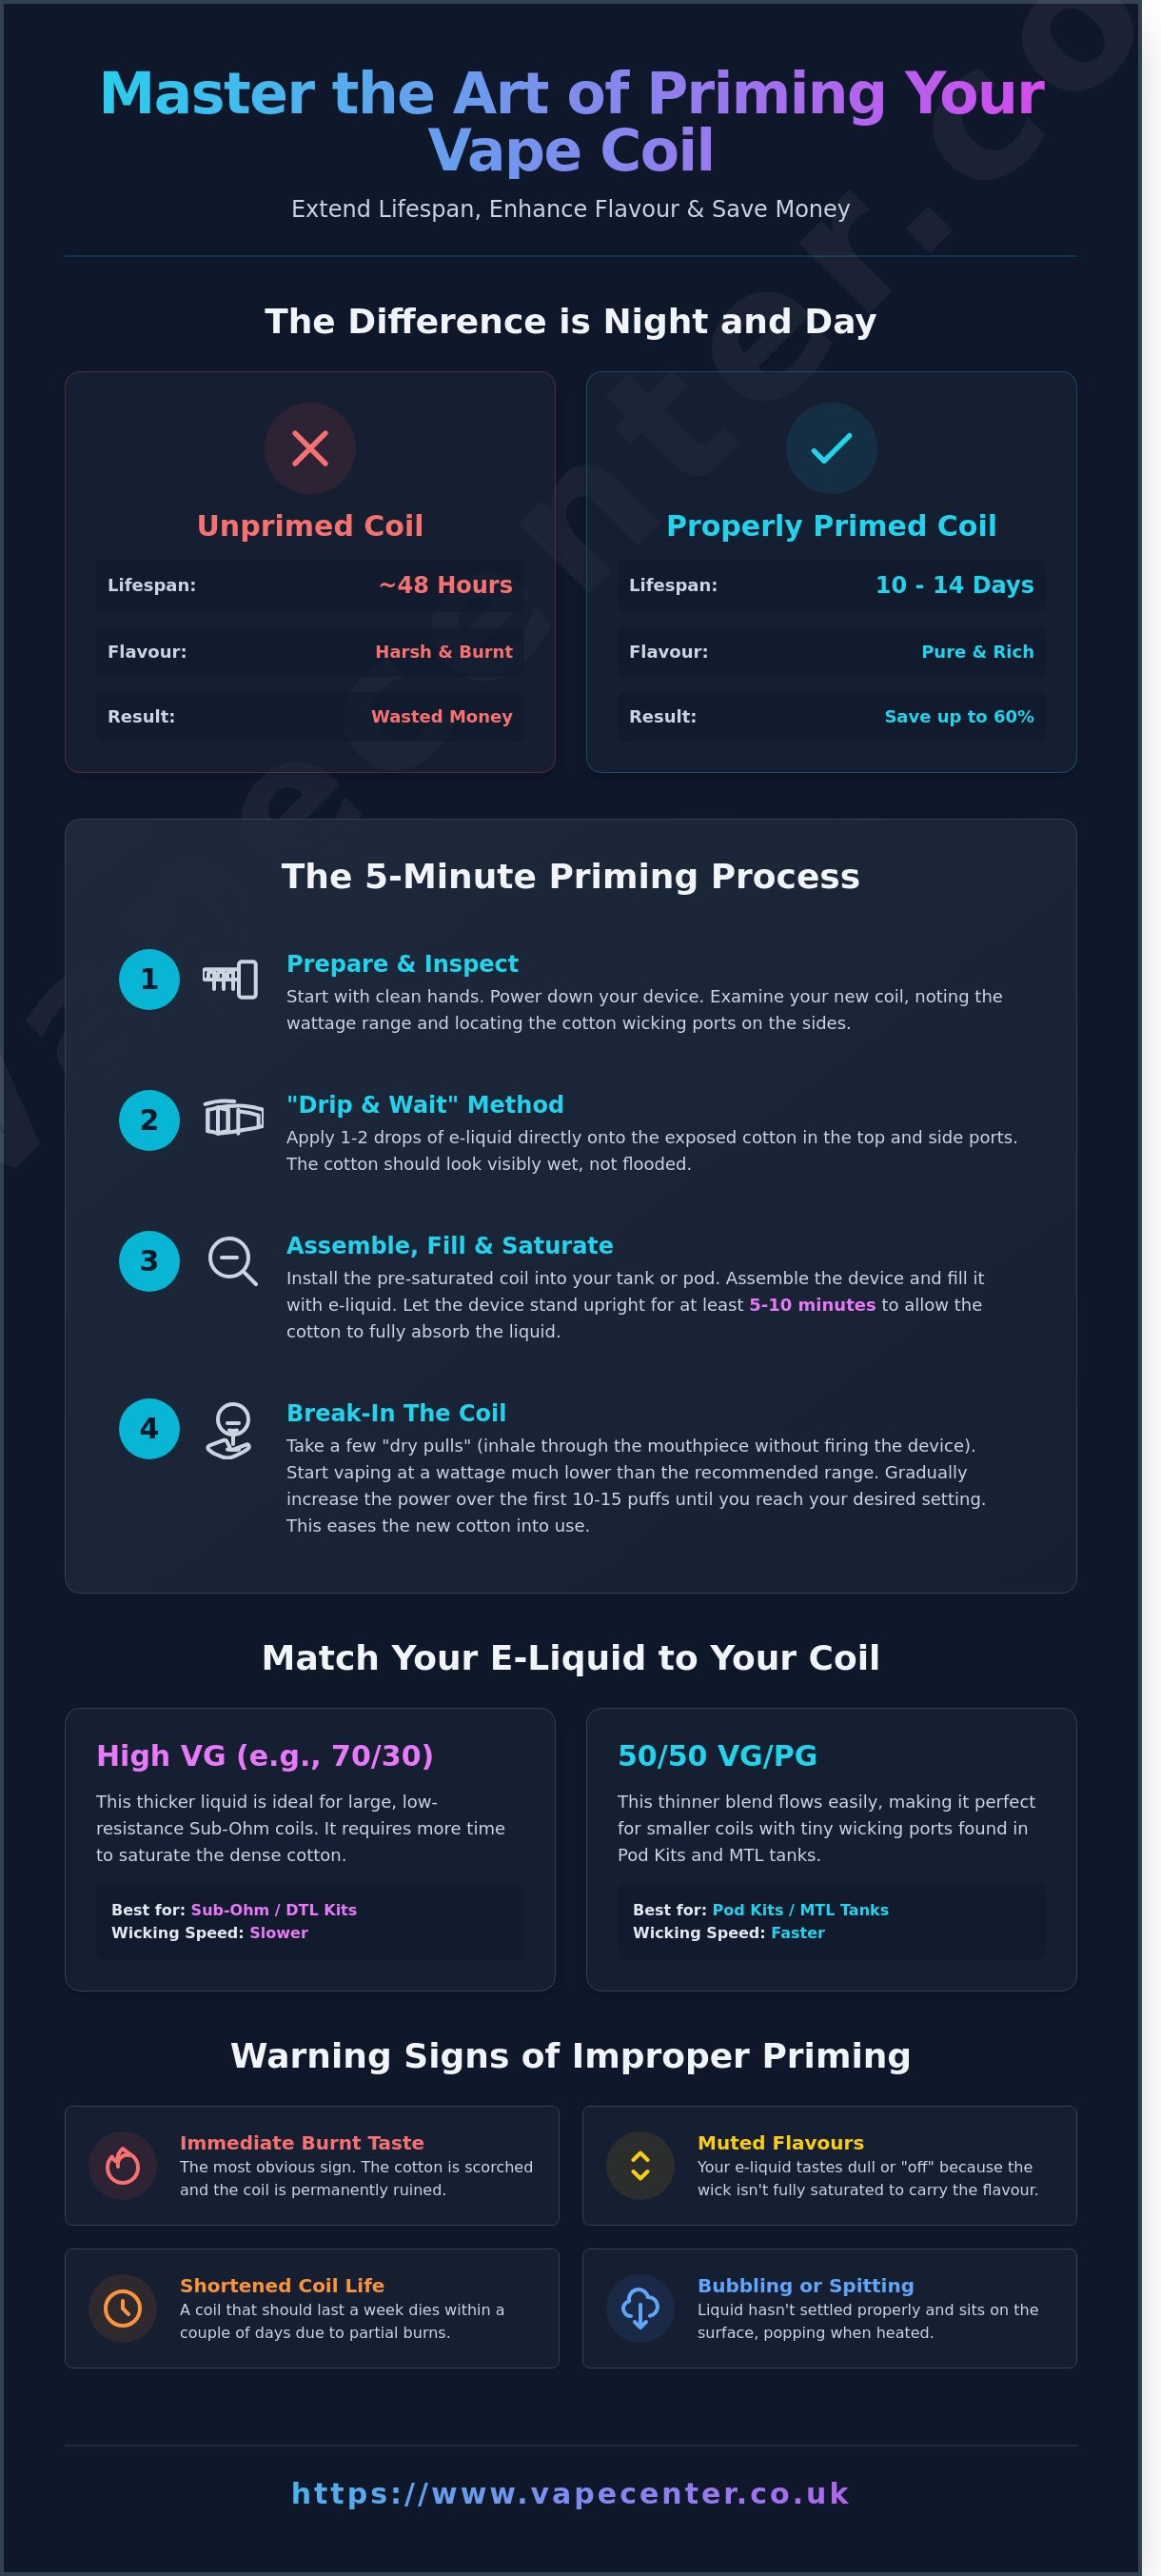
Priming a vape coil is the essential process of pre-saturating the organic cotton wick with e-liquid before you ever fire your device. It's a simple step that separates a premium vaping experience from a costly mistake. When you unbox a new coil, the wicking material is bone dry. These brand new coils are naturally hydrophobic. They don't absorb liquid instantly. If you apply power to a dry coil, the internal heating element reaches temperatures exceeding 200°C in milliseconds. This heat scorches the dry cotton and causes permanent damage to the internal structure.
Learning how to prime a vape coil properly is the best way to avoid the "dry hit." A dry hit delivers a foul, burnt taste that ruins your e-liquid and stays in your mouth for hours. Beyond the taste, there's a significant financial benefit. A pack of five replacement coils in the UK typically costs between £12 and £18. A poorly primed coil might only last 48 hours before the flavour degrades. A correctly primed coil often lasts 10 to 14 days. By taking five minutes to prime, you can triple the lifespan of your hardware and reduce your monthly spend on accessories by 60%.
The Anatomy of a Vape Coil
Every atomiser head contains two main components: a heating element and a wicking material. Most modern UK kits use organic cotton for the wick and either a wire coil or a mesh strip for the heater. Understanding how vape coils work is vital for any vaper. E-liquid travels from your tank through small wicking ports on the side of the metal casing. It then saturates the cotton. Built-in pod coils often have smaller ports than large replaceable sub-ohm atomisers. Regardless of the size, the liquid must reach the centre of the wick to prevent the metal from burning the fibres.
Signs You Haven’t Primed Correctly
The most obvious sign of a priming failure is an immediate burnt taste. This happens when the cotton is singed. Once the cotton burns, the flavour is ruined forever. You can't "wash out" a burnt taste. Other signs are more subtle:
- Muted Flavours: Your premium e-liquid tastes dull or "off" compared to previous bottles.
- Shortened Life: A coil that should last a week dies within two days of use.
- Bubbling or Spitting: If the liquid hasn't settled properly into the wick, it may sit on the surface and pop when heated.
If you experience these issues, it's a clear indicator that the wick wasn't fully saturated before use. Always allow enough time for the liquid to penetrate the dense cotton layers to ensure a satisfying and consistent hit.
Preparing for Success: What You Need Before You Start
Success starts with a clean setup. Before you handle any internal components, ensure your device is completely powered down. Most modern UK vape mods use a five-click safety lock to prevent accidental firing. This is a vital step for vape safety because firing a dry coil will instantly scorch the cotton. Hygiene matters too. Wash your hands to remove natural oils, dust, or debris that could contaminate your wick and distort the flavour of your e-liquid. Set up on a flat, lint-free surface like a desk or a clean tray to avoid losing small parts like top caps or seals.
The Role of E-Liquid Viscosity (VG/PG)
The thickness of your juice determines how quickly the cotton absorbs it. High VG liquids, such as 70/30 ratios, are viscous and require more time to saturate the dense wicking material found in sub-ohm coils. In contrast, 50/50 blends are thinner and flow faster, making them ideal for Mouth-to-Lung (MTL) pod kits. If you use a high-VG juice in a small MTL coil with tiny wicking holes, you risk dry hits. You can learn more about finding the perfect ratio in our e liquid guide. Always check the "Best Before" date on your bottle; expired juice often loses its intended consistency and fails to wick at the correct rate.
Inspecting Your New Coil
Take a moment to examine the hardware before installation. Every authentic coil has its recommended wattage range laser-etched onto the metal casing. For example, a 0.2ohm sub-ohm coil might be rated for 60W to 80W. Verifying this now ensures you don't overwhelm the cotton during your first few puffs. Check for manufacturing defects like loose rubber O-rings or misaligned mesh strips inside the chimney. Identifying the wicking ports, which are the small circular or rectangular holes where the white cotton is visible, is the most important part of learning how to prime a vape coil effectively. These ports are your primary entry points for the juice. If you need fresh hardware to get started, browse our extensive collection of vape coils to find the exact match for your tank. Understanding how to prime a vape coil properly begins with these small mechanical checks to ensure every component is in peak condition.
Step-by-Step: How to Prime Different Vape Hardware
Success starts with identifying your specific device. The UK market is dominated by two main hardware types: traditional tanks with replaceable coils and modern refillable pod systems. Each requires a slightly different technique to ensure the cotton is fully saturated before you press the fire button. Learning how to prime a vape coil correctly prevents the dreaded dry hit and keeps your hardware running efficiently for longer.
Method A: Priming Replaceable Tank Coils
Traditional tanks use the "Drip and Wait" method. These coils are typically larger and have visible wicking ports on the sides. Follow these steps for a perfect setup:
- Apply 2-3 drops of e-liquid directly onto the exposed cotton through the side wicking ports.
- Add one small drop to the top of the coil. Be careful here; don't flood the centre chimney, as this causes spitting and gurgling.
- Screw or push the coil into the base of the tank.
- Fill the tank with your chosen e-liquid and let it stand for at least 10 minutes.
Method B: Priming Pod Kits and Refillable Pods
Pod systems often use the "Fill and Sit" method because the coils are frequently built into the pod or have very small wicking holes. Fill your pod to roughly 80% capacity. Leaving a small air bubble at the top helps maintain the correct internal pressure, which prevents the pod from leaking through the airflow. You should wait at least 15 minutes before vaping. Pods often require this longer steeping time because the cotton is packed more tightly than in larger tank coils. For more advice on choosing the right device for your needs, see our vape kits guide.
Safety is a priority for every vaper. All products sold in the UK must adhere to strict UK e-cigarette regulations, which cover tank capacity and ingredient safety. Once you've primed your coil, perform a final safety check. Ensure the coil is seated flush against the O-rings. A gap of even 0.5mm can cause e-liquid to seep into the battery connection. If you're using a push-fit coil, press it firmly until you feel it click or stop. This simple check protects your device from liquid damage and ensures a consistent electrical connection for every puff.
Knowing how to prime a vape coil is a basic skill that saves you money. A well-primed coil can last up to 14 days, whereas a dry-fired coil is ruined in less than a second. Take your time during this process to get the best performance from your premium e-liquids and hardware.
Advanced Techniques: The Dry Pull and Breaking In
Mastering how to prime a vape coil involves more than just a few drops of e-liquid. To get up to 25% more life from your hardware, you need to use specific wicking methods that prepare the cotton for high temperatures. These advanced steps prevent the dreaded "burnt hit" that often ruins a fresh coil within the first 10 puffs.
The Art of the Dry Pull
The dry pull is a 10-second technique that speeds up the wicking process by using physics rather than power. It's particularly effective for high-VG e-liquids which are thicker and slower to soak into dense cotton. Follow these steps to ensure total saturation:
- Close your tank's airflow control ring completely so no air can enter.
- Take 2 or 3 short, sharp draws on the drip tip without pressing the fire button.
- This creates a vacuum inside the tank that forces e-liquid directly into the centre of the wick.
Don't take more than 3 pulls. Exceeding this limit creates too much pressure and leads to flooding. If you overdo it, you'll experience "spit-back" where hot e-liquid jumps into your mouth during your first real puff. Two controlled draws are usually enough to see the bubbles rising in your tank, which confirms the liquid is moving.
Breaking In Your New Coil
Jumping straight to your maximum wattage is the fastest way to char new cotton. Even if you've followed every step of how to prime a vape coil, the fibres need time to expand and settle. Start your device 5 to 10 watts below the minimum recommended setting printed on the side of the coil. If your coil is rated for 60W to 80W, set your mod to 50W for the first few inhalations.
Take 3 or 4 short puffs at this low power. Use the "Pulse" technique by pressing the fire button in 0.5-second bursts rather than holding it down. This gently warms the liquid and reduces its viscosity without stressing the wire. Increase your power by 2 or 3 watts every few minutes until you reach your preferred setting. You'll know the coil is fully broken in when the initial "starchy" cotton taste disappears and the flavour profile of your e-liquid becomes crisp and clear. This process typically takes about 15 to 20 puffs to complete.
Ready to put these techniques to the test? Stock up on replacement vape coils from our extensive collection to ensure you always have a fresh spare ready for your next session.
Maintaining Your Coil for Maximum Longevity
You've mastered how to prime a vape coil, but consistent maintenance determines if that coil lasts 48 hours or a full 14 days. Keeping your tank at least 50% full is the most effective way to stop wick starvation. When juice levels drop below the side wicking ports, the cotton inside the coil dries out. Firing a dry wick even once at 40 watts can cause permanent singeing. This damage is irreversible and will immediately ruin the flavour of your e-liquid.
Avoid "coil killer" e-liquids that contain high levels of sucralose or artificial sweeteners. These ingredients caramelise on the heating element at temperatures exceeding 200°C, creating a thick black crust known as gunk. This buildup prevents the coil from heating evenly and kills the crisp notes of your juice. Switching to a cleaner, premium liquid can extend your coil life by 60% in most sub-ohm setups. It's a simple change that saves you money on hardware in the long run.
Daily Maintenance Habits
Spend 60 seconds each morning cleaning your device to ensure a better experience. Use a cotton bud or twisted tissue to wipe the inside of the drip tip and the chimney. This removes condensation that otherwise drips back onto the coil, causing "spit-back" or gurgling sounds. Ensure your vaporesso pods or other tank systems are stored upright when not in use. Gravity helps the e-liquid stay in contact with the wicking ports, ensuring the cotton is always saturated for your next puff. If you see black residue forming on the wire through the top of the tank, it's time to prepare for a swap.
When to Change Your Coil
A harsh, burnt taste is the final warning that your coil is dead. You'll likely notice a 30% drop in vapour production or a muted, "flat" flavour profile several hours before the burnt taste arrives. Watch for the "browning" effect in your tank. If your clear e-liquid starts looking like dark tea, carbon from the burnt cotton is leaching back into the reservoir. Don't ruin a fresh 10ml bottle of juice by using an old, degraded coil. Order your replacement coils before you reach this stage to ensure your vape remains satisfying and consistent. Knowing how to prime a vape coil is only half the battle; knowing when to bin it is just as vital for a premium experience.
Master Your Flavour and Maximise Your Hardware
Perfecting your setup ensures every puff delivers the crisp, clean taste you expect from your e-liquid. By taking 5 minutes to properly saturate your wicking material, you eliminate the risk of instant burnout and frustrating dry hits. Learning how to prime a vape coil correctly can increase your coil longevity by 25% or more; this means you spend less on replacements and more time enjoying your device. Whether you use a high-wattage sub-ohm tank or a compact pod kit, these steps are essential for consistent performance.
Vape Center is your ultimate UK destination for high-quality components. We're a leading provider of hardware from top-tier brands including Geekvape, Vaporesso, and SMOK. We also stock carefully crafted e-liquids designed to work perfectly with every coil type in our inventory. If you're running low on supplies, don't forget that next-day delivery is available across the UK to keep you vaping without interruption. We pride ourselves on being a reliable, one-stop shop for every UK vaper.
Shop our extensive collection of premium replacement coils and pods to find the perfect match for your device today. It's time to stop wasting money on burnt cotton and start experiencing the full potential of your kit.
Frequently Asked Questions
How long should I wait after priming a new coil?
Wait for 10 minutes after you've filled your tank to ensure the cotton is fully saturated. This 600-second window allows the e-liquid to reach the centre of the wick properly. Skipping this wait time leads to dry hits and ruins a brand new £3.00 coil instantly.
Can I prime a vape coil with water or other liquids?
Use only e-liquid to prime your hardware. Water or other liquids will damage the heating element and produce zero vapour. UK safety standards for e-liquids ensure the ingredients are safe for inhalation; water can cause hot droplets to spit into your mouth and cause minor burns.
Why does my new coil still taste burnt after priming?
Your coil might taste burnt if you haven't allowed enough time for saturation or if you've started at a wattage that's too high. About 5% of factory-made coils are "duds" with tightly packed cotton that resists liquid. Start your device 10W lower than the recommended setting to break it in safely without scorching the wick.
Do I need to prime disposable vapes?
You don't need to prime disposable vapes like an Elf Bar or Crystal Bar. These devices come pre-filled with 2ml of nic salts and the wick is already fully soaked during the manufacturing process. Simply remove the rubber bung and start vaping immediately as the priming is done at the factory.
How many drops of e-liquid should I put on the coil?
Apply 3 to 5 drops of e-liquid directly onto the exposed cotton ports of the coil. For larger sub-ohm coils, you might need up to 8 drops to see the cotton turn translucent. This is a crucial step in learning how to prime a vape coil to avoid burning the dry wick on your first puff.
Can I clean a burnt coil to make it taste fresh again?
You can't clean a burnt coil to restore its original flavour. Once the internal cotton is charred at temperatures exceeding 200°C, the carbon deposits remain trapped in the fibres. While some users rinse coils in warm water, it rarely removes the acrid taste and often results in a 40% reduction in vapour production.
What happens if I forget to prime my coil?
Forgetting to prime your coil results in an immediate dry hit that chars the cotton wick instantly. Without liquid to dissipate the heat, the metal wire reaches high temperatures in under 0.5 seconds and burns the dry material. You'll need to bin the coil and spend another £2.50 to £4.00 on a replacement part.
Is it possible to over-prime a coil?
Yes, adding too much liquid causes flooding where the e-liquid sits in the centre of the coil chimney. This leads to spit-back and leaking through the bottom airflow vents. If you've over-primed, you'll hear a gurgling sound; fire the device for 1 second while blowing gently into the mouthpiece to clear the excess liquid.