
How to Clean a Vape Tank and Coil: The Ultimate Maintenance Guide (2026)
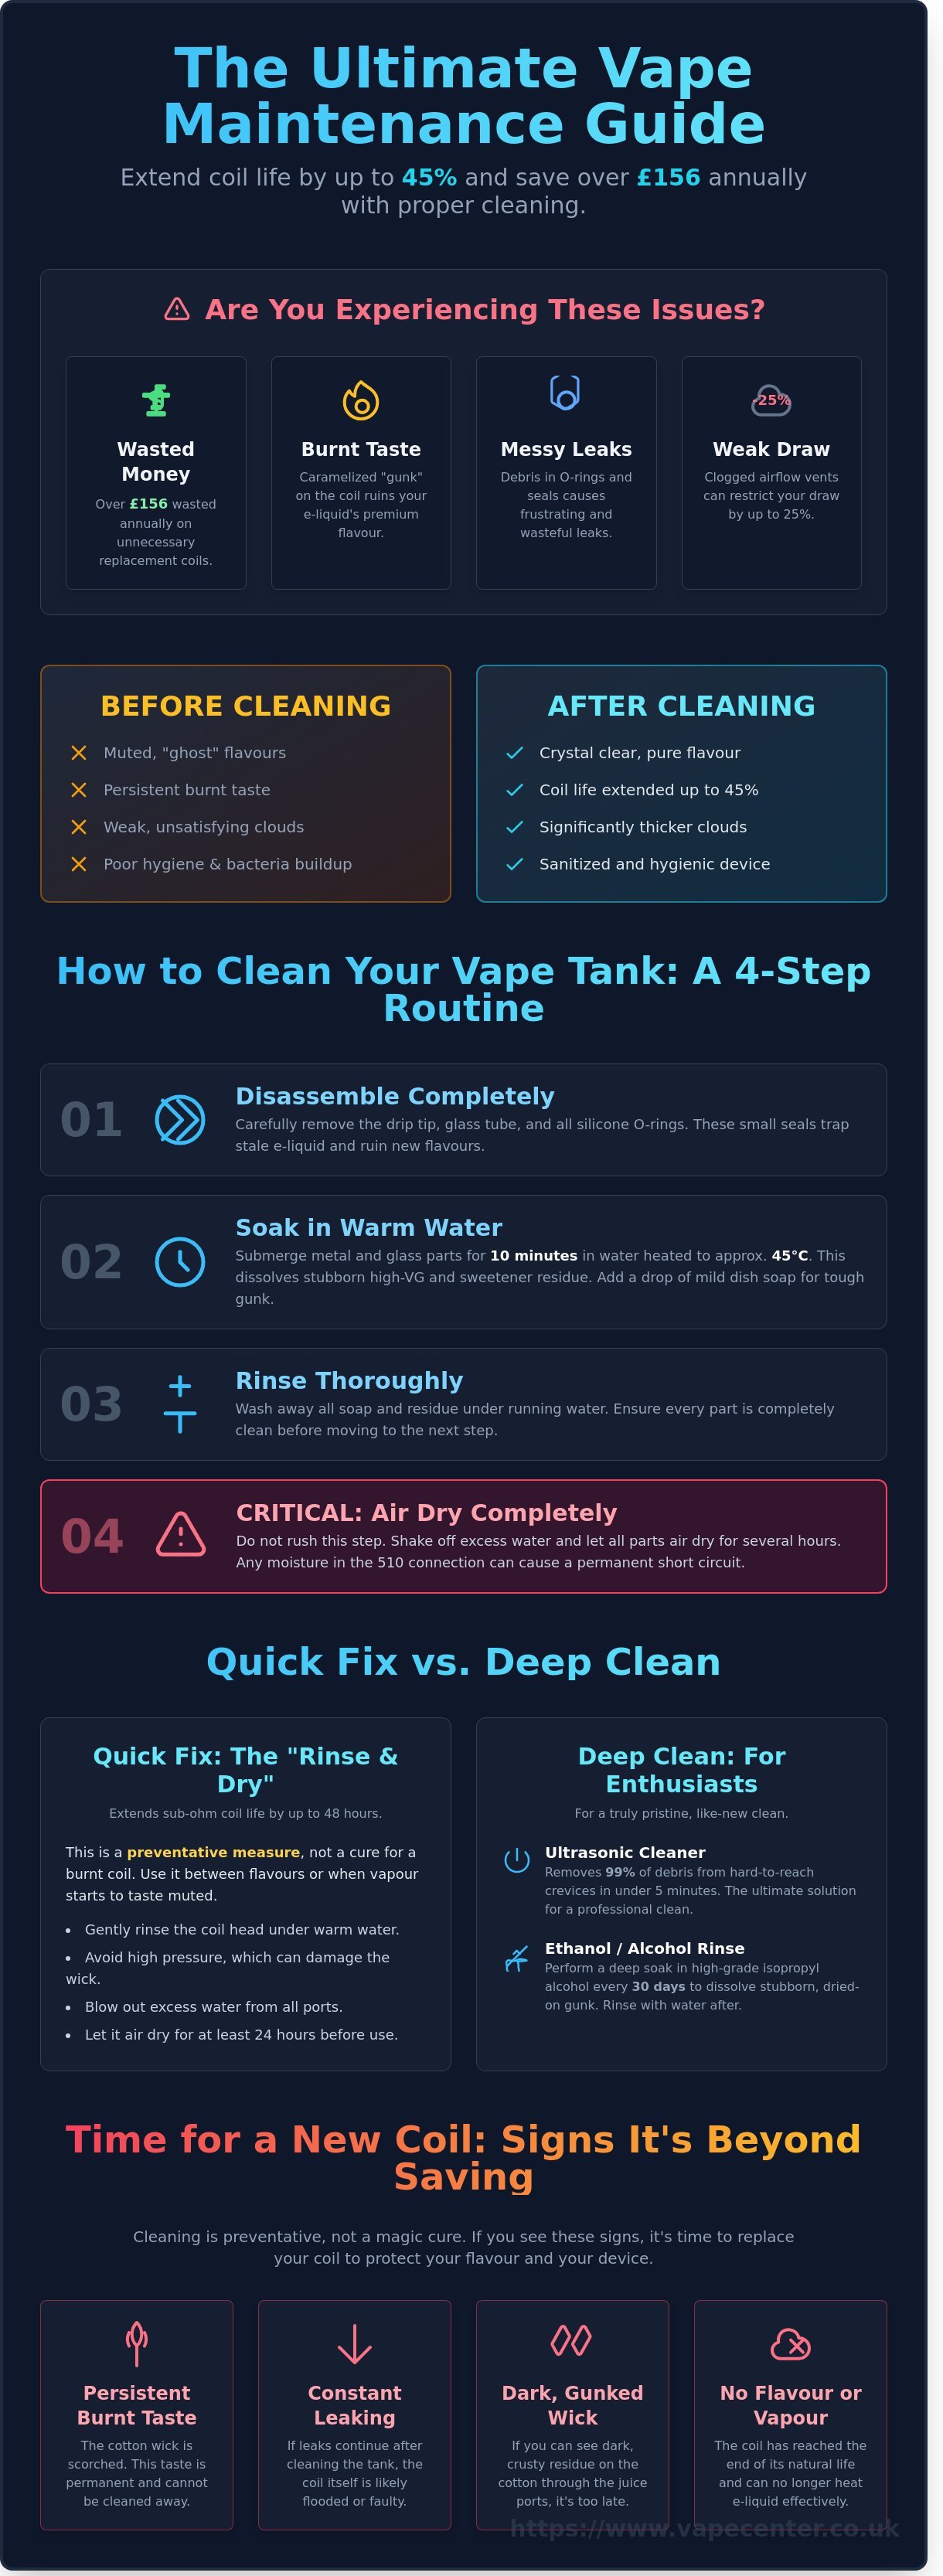
You are likely wasting over £156 every year on replacement coils that simply don't need to be binned yet. Most vapers across the UK struggle with a persistent burnt taste or messy leaks, but the solution isn't always buying new hardware. Learning exactly how to clean vape tank coil parts is the most effective way to save money while keeping your kit in peak condition. It's incredibly frustrating when a premium e-liquid is ruined by residue from your last flavour, or when a tiny bit of debris in an O-ring causes a leak in your pocket.
We agree that vaping should be a seamless, high-quality experience rather than a series of technical headaches. This ultimate 2026 guide will teach you how to master the art of device maintenance for crystal clear flavour and significantly thicker clouds. We will provide a step-by-step breakdown on how to sanitise your mouthpiece, scrub your tank, and extend your coil life by up to 45% to lower your monthly spend.
Key Takeaways
- Master the removal of e-liquid gunk to restore the premium flavour and vapour production of your favourite setup.
- Follow a foolproof routine for how to clean vape tank coil parts, including the precise disassembly of O-rings and drip tips.
- Save on replacement costs by using the "Rinse and Dry" technique to extend the life of your sub-ohm heads by up to 48 hours.
- Explore professional-grade maintenance options like ultrasonic cleaners and ethanol rinses for a deeper, more satisfying vape.
- Learn to spot the "Persistent Burnt Taste" and other visual cues that signal it’s time to bin your coil and grab a fresh one.
Understanding Your Vape Hardware: Why Cleanliness is Essential
Your vape kit is a precision tool designed for performance. To keep it running at peak levels, you must understand the components of a vape device and how they function together. The tank serves as a secure reservoir for your e-liquid, while the coil acts as the vital heating element. When you use high-VG liquids or juices heavy with sweeteners, a residue often called "gunk" begins to form. This sticky buildup is the result of caramelised sugars and thick vegetable glycerine that won't vaporise completely. Over time, this layer insulates the coil, forcing it to work harder and ruining the crisp notes of your favourite premium e-liquid.
Hygiene is another major factor that many users overlook. Your drip tip is a magnet for pocket lint, dust, and bacteria. Since this part makes direct contact with your mouth, keeping it sterile is essential for a healthy experience. There's a clear financial incentive to staying clean too. In the UK, a pack of replacement coils typically costs between £12 and £18 depending on the brand. If you learn how to clean vape tank coil components properly, you can extend the life of your hardware significantly. Regular maintenance can double the time between replacements, keeping more money in your pocket while ensuring a satisfying draw every time.
A dirty setup doesn't just taste bad; it's inefficient. When residue builds up on the internal walls of your tank, it can contaminate new juice immediately. You might think you're enjoying a fresh bottle of menthol, but the lingering notes of yesterday's tobacco blend will still be present. Mastering how to clean vape tank coil assemblies ensures you get the exact flavour profile the manufacturer intended. It transforms a mediocre experience into a professional-grade session.
The Anatomy of a Dirty Vape
Is your juice losing its punch? You might be suffering from "vaper's tongue," which is a temporary sensory fatigue. However, it's more likely a result of hardware buildup. Clogged airflow vents can restrict your draw by up to 25%, making your device feel underpowered. You should also watch for e-liquid oxidation. When old juice sits in a dirty tank, it reacts with oxygen and turns a dark, muddy brown. This chemical change alters the nicotine hit and makes the vapour harsh on your throat.
Maintenance vs. Repair: Managing Expectations
You need to know what cleaning can and cannot do. You can't fix a burnt coil. Once the cotton wick is scorched or carbonised, the acrid "burnt" taste is permanent. Cleaning is a preventative measure, not a magic cure for a dead atomiser. A clean tank ensures your new coil performs at 100% capacity from the very first puff. We recommend a quick warm water rinse every time you switch flavours. For a thorough job, a deep soak in high-grade isopropyl alcohol should happen every 30 days to remove stubborn, dried-on residue from the threads and seals.
How to Clean Your Vape Tank: A Step-by-Step Routine
Maintaining your hardware is the fastest way to simplify your vaping experience and ensure every puff remains fresh. Start by stripping the tank to its base components. You must remove the drip tip, the glass tube, and every silicone O-ring. These small seals are notorious for trapping 2ml or more of stale liquid in the grooves. If you leave them on, you'll never truly get rid of that lingering ghost taste from your last bottle of liquid. Lay the parts out on a clean surface to ensure you don't lose the smaller 0.5mm gaskets during the process.
Temperature is your best friend during the second stage. Use water heated to approximately 45°C. High-VG liquids are viscous and stubborn; cold water simply glides over the surface without removing the film. Submerge the metal and glass parts for 10 minutes. This heat level effectively dissolves the sugar substitutes found in many premium UK e-liquids. Scientific studies emphasize the importance of cleaning e-liquid residue to prevent the accumulation of degraded compounds that might affect your inhale. For heavy users, this 10-minute soak should be a weekly ritual.
If your tank still smells like strong menthol after a soak, add a single drop of mild dish soap. Use a dedicated container to avoid cross-contamination with kitchen grease. For those who want a professional finish, specialised ultrasonic cleaners can remove 99% of debris from hard-to-reach crevices in under 300 seconds. This level of maintenance is why enthusiasts often search for how to clean vape tank coil parts, as it extends the life of the entire assembly and protects your £60 investment.
The drying phase is where most vapers rush, yet it's the most critical step. Water is a conductor. If moisture remains in the 510 threading when you connect it to your battery, you risk a permanent short circuit. Shake each piece vigorously and leave them on a clean surface for at least 4 hours. Ideally, wait 12 hours to ensure total evaporation from the internal chimneys and airflow control rings.
Deep Cleaning the Glass and Chimney
Stubborn menthols and dark tobaccos stick to the chimney walls with surprising tenacity. Use a soft toothbrush to scrub the threaded sections for 30 seconds to remove calcified gunk. This prevents cross-contamination between different flavour profiles. Always inspect your O-rings for tiny tears or thinning during this stage. If you spot any damage, browse our extensive collection of replacement parts to avoid messy leaks and maintain a perfect vacuum seal.
Drying and Reassembly for Peak Performance
Use the paper towel method by rolling a small piece of tissue and threading it through the airflow slots. This absorbs the hidden droplets that cause spit-back on your first puff. Before you screw the pieces back together, apply one drop of e-liquid to each O-ring. This lubrication ensures a tight seal and prevents the rubber from snapping under friction. Mastering how to clean vape tank coil housings and reassembling them correctly ensures your device remains a leading provider of satisfying vapour.
Cleaning Vape Coils: Can You Actually Restore a Dirty Coil?
Many vapers want to know the secret of how to clean vape tank coil heads to save money. The reality is that replaceable stock coils, those found in popular sub-ohm tanks, are not designed for deep cleaning. These units feature a heating element tightly wrapped in layers of organic cotton. Once the cotton becomes saturated with caramelised sugars from your e-liquid, it stays there. You can't scrub the internal wick without destroying the coil structure itself.
If your coil tastes slightly muted but isn't burnt, you can extend its life by approximately 24 to 48 hours using a basic rinse. This won't make it "new," but it can bridge the gap until your next delivery arrives. However, if you've experienced a "dry hit" that scorched the cotton, no amount of cleaning will help. Burnt cotton undergoes a chemical change; those black marks are permanent and will continue to ruin the flavour of any fresh juice you add. When the wick is charred, the only solution is a fresh replacement.
Rinsing Stock Coils: A Temporary Fix
To perform a basic rinse, remove the coil from your tank and hold it under warm running water for 60 to 90 seconds. This process flushes out dark, residual e-liquid from the wicking ports. It's vital to let the coil dry completely before use. A 24-hour drying period on a paper towel is the minimum requirement. If you try to vape while the internal cotton is still holding water, you'll experience weak vapour production and hot "spit back" because water vapourises at a different temperature than e-liquid. Never use soap or domestic cleaning agents. These chemicals saturate the wick and are impossible to rinse out fully, creating a significant health risk when heated.
Dry Burning Rebuildable Coils (RBA)
Rebuildable coils (RDAs and RTAs) are the exception to the rule. Because the wire is exposed, you can clean it effectively dozens of times. Start by removing the old, dirty cotton and discarding it. Pulse your battery at a low setting, typically 15W or 20W, until the metal glows a dull orange. This process burns off the carbon crust that builds up from sweet e-liquids. For a more thorough result, advanced users often use a "water dip" technique. They heat the coil until it's glowing and then carefully dip just the metal heating element into a small cup of cold water. This creates a thermal shock that vibrates the gunk off the wire instantly.
Understanding how to clean vape tank coil setups depends entirely on the hardware you use. While you can pulse a Kanthal or Stainless Steel wire until it looks brand new, you must replace the cotton wick every time. Cotton is a consumable item. In the UK, a large bag of high-quality organic cotton costs around £5 and will last for months. If you're using stock coils, remember that a pack of five replacements usually costs between £12 and £18. If your coil is more than 10 days old or the wick is visibly charred, replacement is always better than cleaning for maintaining a premium experience.
- Stock Coils: Only suitable for a light water rinse; results are temporary.
- Rebuildables: Highly effective to clean via dry burning and water dipping.
- Warning: Burnt cotton is irreversible and must be replaced immediately.
- Drying: Always allow 24 hours for stock coils to air dry to avoid short circuits.
Advanced Cleaning Techniques: From Ultrasonic Baths to Ethanol Rinses
Standard rinsing works for daily maintenance, but mastering how to clean vape tank coil components thoroughly requires more professional tools. When e-liquid residue hardens into a stubborn film, it affects the heating efficiency and ruins the profile of your premium juices. These advanced methods ensure your hardware performs like it just came out of the box. For those using rebuildable atomisers or high-end sub-ohm tanks, these steps are essential for maintaining peak flavour.
The Ultrasonic Cleaner Advantage
Ultrasonic cleaners are the preferred choice for vaping connoisseurs who demand perfection. These machines use high-frequency sound waves, typically at 40kHz, to create cavitation bubbles in a water bath. These bubbles implode against the surface of your tank parts, stripping away microscopic gunk from threaded areas and airflow holes that brushes cannot reach. A 10-minute cycle is usually enough to remove months of carbon buildup from metal surfaces.
- Efficiency: Clean up to five disassembled tanks simultaneously in a single session.
- Precision: Sound waves penetrate deep into the internal chimneys and juice ports of sub-ohm tanks.
- Investment: Entry-level cleaners cost between £25 and £45, providing a cost-effective way to extend hardware life.
Solvent Cleaning: When Water Isn’t Enough
Oily e-liquid flavours like coffee, tobacco, or heavy creams often leave a lingering scent that water won't touch. If you want to know how to clean vape tank coil housing effectively after using these liquids, high-proof alcohol is the answer. Use unflavoured vodka with a 37.5% or 40% ABV rating to dissolve the bond between the residue and the metal. Soak the metal components for 12 hours before performing a final rinse with warm distilled water.
You must avoid using isopropyl alcohol or rubbing alcohol on any part that contains a wick or porous material. These chemicals leave behind toxic residues that are dangerous to inhale. Stick to food-grade ethanol or vodka for safety. Always dry your components completely with a lint-free cloth or paper towel to prevent any water spots or oxidation. This process ensures that your next liquid tastes exactly as the manufacturer intended.
The baking soda and vinegar method provides a natural alternative for deep cleaning. Place your disassembled tank parts in a bowl and cover them with two tablespoons of bicarbonate of soda. Pour white vinegar over the parts until they are submerged. The resulting fizzing action mechanically lifts debris from the metal surfaces. This method is particularly effective for removing the ghosting effect of strong menthol or citrus e-liquids that often haunt a tank for weeks.
Safety is a priority when using solvents or acidic cleaners. Many modern tanks use polycarbonate or acrylic windows which can crack or craze when exposed to high-proof alcohol. Always remove your rubber O-rings and silicone seals before an alcohol soak. These materials can swell or degrade, leading to leaks and pressure issues. If your tank uses specialised coatings or paint, test a small area first to ensure the solvent doesn't strip the finish or dull the shine.
Looking to upgrade your setup or replace worn-out parts? Explore our extensive collection of vape hardware to find the latest high-performance tanks and coils.
Knowing When to Replace: Signs Your Coil is Beyond Saving
Understanding how to clean vape tank coil components can extend their life, but cleaning isn't a permanent solution for a component that's physically worn out. Every coil has a finite lifespan. Once the internal heating element or the wicking material reaches a certain point of degradation, no amount of rinsing or soaking will bring it back to life. You need to know exactly when to stop cleaning and start replacing to ensure your safety and enjoyment.
Perform the "Persistent Burnt Taste" test as your primary diagnostic tool. If you've thoroughly cleaned your hardware and your first few puffs still taste like charcoal or burnt toast, the cotton wick is singed. Singed cotton is carbonised; it's physically impossible to "un-burn" those fibres. Vaping on a charred wick provides a harsh, acrid throat hit that ruins the profile of your e-liquid. If that burnt flavour remains after a deep clean, bin the coil immediately.
A visual inspection often reveals the truth about a coil's health. Shine a torch down the centre of the coil chimney to look at the wire and the surrounding cotton. In a fresh coil, the wire is shiny and the cotton is white. In a dead coil, the wire often looks black, crusty, or "gunked up" with a thick layer of carbonised sweetener. This buildup acts as an insulator, preventing the heat from reaching your juice efficiently. If the wire looks like it's covered in soot, cleaning won't help much because the metal surface has already begun to pit and degrade.
Performance issues like leaking and "spit-back" are clear indicators of a failing wick. Over time, the cotton fibres inside the coil head lose their structural integrity and become thin. When this happens, they can no longer hold back the e-liquid in the tank. This leads to juice flooding the airflow sensor or leaping up the chimney into your mouth. If your tank starts leaking consistently despite you knowing how to clean vape tank coil parts properly, the wick is simply too far gone to do its job.
Adhering to the 2-week rule is a safe bet for most regular vapers. Even if the flavour seems okay, most sub-ohm coils are designed to handle roughly 20ml to 40ml of e-liquid before the metal heating element suffers from heat fatigue. For the average user, this translates to about 10 to 14 days of use. Pushing a coil beyond this point often results in a rapid decline in vapour production and nicotine delivery.
The Dangers of Vaping a "Dead" Coil
Vaping a degraded coil isn't just a matter of bad taste; it's a matter of safety. When wicks become overly charred, they can produce harmful byproducts like acrolein or formaldehyde through incomplete combustion. Furthermore, a clogged coil puts immense strain on your device. Your battery has to work harder to heat the gunked-up wire, which can reduce your battery's daily life by up to 15%. Don't waste a £5 bottle of premium juice trying to save a £2.50 coil.
Stocking Up for Seamless Vaping
Maintaining a consistent experience requires preparation. It's best practice to keep a spare pack of replacement coils in your drawer so you're never caught out by a sudden burnt hit. When buying, ensure you select the correct resistance for your kit. A 0.15 Ohm coil requires significantly more wattage than a 0.6 Ohm coil. Using the wrong resistance can lead to immediate burning or a lack of vapour. Browse our extensive collection of premium coils and pods at Vape Center.
Maximise Your Flavour and Hardware Longevity
Consistent maintenance is the only way to guarantee 100% pure taste from your premium e-liquids. Mastering how to clean vape tank coil components prevents the buildup of 2-week-old residue and keeps your device running efficiently. While advanced methods like ultrasonic cleaning can extend a coil's lifespan by 3 to 5 days, most coils require a full replacement after 14 days of heavy use to maintain peak safety standards. Don't settle for muted flavours or a burnt throat hit when professional-grade results are this simple to achieve.
Vape Center is the UK's leading provider of authentic hardware from trusted brands including Geekvape, Vaporesso, and SMOK. If your components are beyond saving, Shop Premium Replacement Coils & Tanks at Vape Center today. We offer next-day delivery across the UK on orders placed before 4pm and provide expert customer support for all your hardware maintenance questions. Grab your fresh supplies now and keep your setup performing at its absolute peak.
Frequently Asked Questions
Can I use boiling water to clean my vape tank?
You shouldn't use boiling water to clean your vape tank because the extreme heat can warp plastic components and melt rubber O-rings. It's much safer to use warm tap water, ideally between 40°C and 50°C. This temperature is high enough to dissolve stubborn e-liquid residue without compromising the structural integrity of your hardware. A 20 minute soak in warm water usually clears away most gunk effectively.
How often should I clean my vape tank and coil?
You should perform a deep clean of your tank and coil at least once every 7 days to maintain peak performance. If you're a heavy vaper who goes through more than 10ml of e-liquid daily, you might need to rinse your tank every 3 days. Regular maintenance prevents flavour ghosting and ensures your device remains a reliable source for your nicotine needs. Most UK vapers find that a weekly schedule reduces leaking issues by roughly 60%.
Will cleaning my coil make it last forever?
No, cleaning your coil won't make it last forever, though it can extend its functional life by 3 to 5 days. Eventually, the internal cotton wicking material degrades and the heating element loses its ability to vaporise liquid efficiently. Learning how to clean vape tank coil helps you get the most value from your £12 multipacks, but you'll still need a full replacement every 2 weeks for the best experience.
What is the best household liquid to clean a vape tank with?
The best household liquid for a deep clean is unflavoured high-proof vodka or a solution of bicarbonate of soda. Vodka acts as a powerful solvent that breaks down 95% of vegetable glycerine buildup without leaving a chemical aftertaste. If you prefer a cheaper option, mixing 1 teaspoon of bicarbonate of soda with warm water works wonders for removing lingering smells from strong menthol or tobacco e-liquids. Don't use dish soap as it's difficult to rinse out completely.
Can I use a hairdryer to speed up the drying process?
You can use a hairdryer to speed things up, but you must only use the cool air setting. High heat from a dryer can damage delicate seals or cause the tank's glass to expand and crack. Hold the dryer at least 15 centimetres away from the parts and blast them for about 5 minutes. This is a great shortcut compared to the 24 hour air-drying period usually required for the cotton inside a coil to dry out.
Why does my vape still taste burnt after cleaning the tank?
Your vape still tastes burnt because the internal cotton wick has likely charred or reached its physical limit. While you can master how to clean vape tank coil to remove surface residue, you can't fix burnt cotton once the fibres are damaged. If the acrid taste persists after a thorough rinse, it's a sign that the coil's life has ended. Around 85% of burnt hits are caused by gunked-up heating elements that can no longer be salvaged by washing.
Is it safe to clean a disposable vape?
It's not safe or practical to clean a disposable vape. These devices are closed systems with a non-removable battery and a saturated cotton pad rather than a traditional tank. Attempting to wash a 600 puff or 5000 puff disposable risks short-circuiting the internal lithium-ion battery, which is a fire hazard. If your disposable tastes burnt or the 2ml reservoir is empty, simply recycle it at a designated UK battery collection point.
Can I clean my vape pods for a pod kit?
You can clean vape pods if they have replaceable coils, but you should discard fully sealed pods once the coil inside expires. For refillable pods with removable coils, simply pop the coil out and rinse the plastic pod with warm water to clear out old juice. Ensure the pod is 100% dry before you install a fresh coil and fill it with your favourite nic salts. This simple habit keeps your £25 pod kit tasting fresh for much longer.